A Complete Guide On Using Makeup To Cover Dark Spots
Table of Contents
We all fall into a complex when we scroll through our Instagram and see people showing up their extra perfect and spotless skins. Everyone craves flawless skin and uses thousands of products to achieve it. There is nothing terrible in struggling to attain excellent and pristine skin, but at the same time, you should also learn to embrace your imperfections because they are what make you a stronger person.
A quick fix to spotted skin is makeup. Hiding your dark spots and dark circles boosts your confidence and makes it easy for you to mix up with gatherings. If there is one makeup technique that differentiates professional makeup artists from amateurs, it is complexion work. For hiding the dark spots using makeup, you need to learn about the perfect products to use. You also need to develop how you can use different makeup products to hide dark spots well while maintaining an overall realistic appearance.
To hide dark spots, you need to start using an oil-free moisturizer, then apply primer, followed by concealer and a color corrector, as these two products play a crucial role in hiding dark spots. After you are done concealing, you must use a foundation. Foundations come in multiple textures and consistencies. Use the coverage that best fits your needs. Your dark spots should be hidden now. If not, apply concealer again and then the rest of your makeup.
No one ever has perfect skin. The models, bloggers, makeup artists, or whatever public figure you see on Instagram bragging about their “PERFECT” skin, it is all a lie. These people have normal skins with open pores, blemishes, freckles, dark circles, pigmentation, acne, and dark spots. Two ways can help you to achieve an Insta perfect skin. Number 1, you can either learn to edit your photos well to make your skin look flawless. Number 2, you can use makeup to hide your imperfections. If you’re reading this article, then I’m guessing you want to go with number 2.
You need to gain knowledge about how you can use your products. Merely buying the products and layering them on your face does not help you hide your dark spots, dark circles, pigmentation, freckles, or any other imperfection. You should know how you should layer the products on your skin to achieve an Insta-perfect looking skin. Below we have discussed in detail what steps you must follow to hide dark spots.
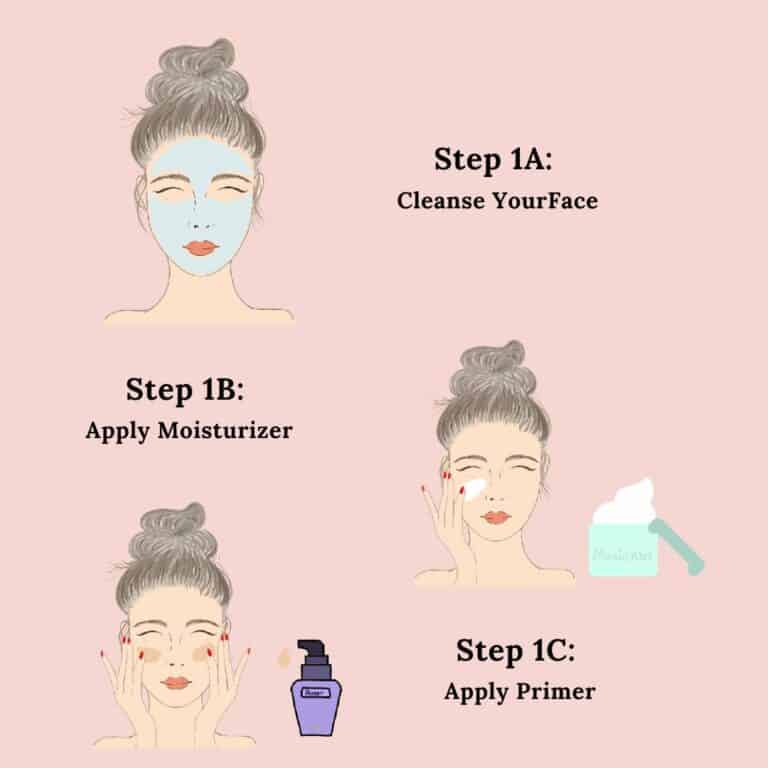
Step 1: Prep and Prime your skin
Before applying foundation, concealer, or any other complexion product, you need to prepare and prime your face well. For preparing the skin, you should use a non-oily moisturizer. There are many medicated and non medicated oil-free moisturizers available in the market. Make sure whatever moisturizer you use should not be oily or greasy because oily or greasy moisturizer will not let your makeup stay in place somewhat. It will slip off quickly. Thus they don’t help cover your dark spots.
After preparing your skin, the next step is to prime it. Out of the thousands of primers available in the market, choose the one which suits your skin well. A primer should not be greasy. Most of the primers are sticky, and it is a good sign. A tacky primer means your makeup is going to stick to your face for a longer time.
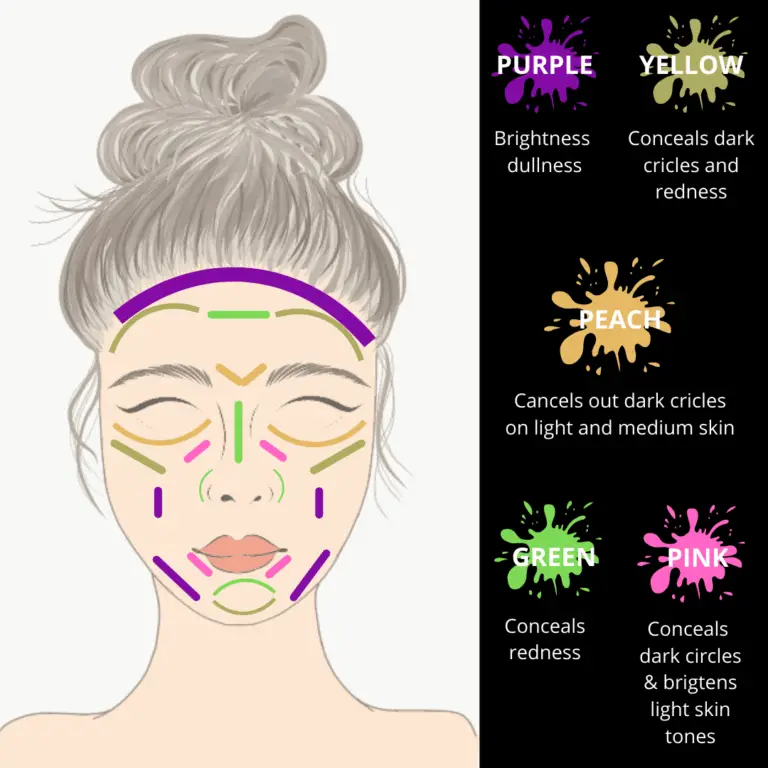
To hide dark spots, color correcting primers are available in the market. Such primers help to neutralize the pigments on your face. A green color correcting primer will reduce redness on the skin. A peach-colored primer will help cover the dark circles and would refine pigmentation.
Step 2: Conceal or Color Correct Dark Spots
A few years back, makeup was all just foundation and face powder. Multiple layers of thick foundations were applied to hide dark spots, pigmentation, and dark circles. Over the decades, like any other industry, the makeup industry has evolved. Beauty researchers are always busy introducing or finding ways to help the makeup industry reach new heights of success.
Nowadays, there exist multiple techniques that help cover dark spots well. One such blessing that the makeup industry has given us is “CONCEALER.” Concealers are great because they quickly hide our imperfections and give us spotless skin in no time.
After you are done prepping and priming your face, the next step is to conceal and color correct your imperfections. Many people use concealers that are too lighter than their skin tone. It is easy to see why. To cover something dark, you use a product that is super light in color. But this is not how the pigment works. If you use a super light-colored concealer to hide dark spots, the color of dark spots will be turned to grey and will not match your skin tone. To hide dark spots, you need to use a concealer with one or two tones darker than your skin tone. This way, your dark spots will be concealed entirely and will not show up when you will apply your foundation.
To cover the dark spots and dark circles, most people use a red-colored or orange-colored correcting concealer. Apply a thin layer, probably a dot of the color correcting concealer on dark spots, and blend it using fingers with the dab, dab technique. Do not rub the finger to blend the concealer; instead, tap the finger on the concealer to get it blended nicely into the skin. Red-colored concealers neutralized the dark pigments, and thus you do not have to apply multiple layers of foundation to make your skin look even-toned. For better coverage, you can top a color correcting with a darker shade of regular concealer. This way, you will not have to apply multiple coats of foundation to hide the pigment of color correctors.
Color correcting comes in cream form and liquid form as well. It would help if you chose a perfect concealer according to your skin type. Cream concealers have a thicker consistency and tend to give a denser and full coverage than liquid concealers.
If you do not have a red color corrector, then here is a quick beauty hack for you. You can use orange-colored lipstick or red-colored lipstick to color correct your dark spots. It is better to use a matte lipstick instead of a glossier one because glossy lipstick may turn out to be greasy on the skin. Glossy lipstick can also cause trouble in blending and would swipe away while blending.
Step 3: Foundation
Step three in hiding the dark spots is the use of foundation. Foundation is the base of makeup, and this is where your whole makeup look is built on. For a flawless makeup look, you need to choose your foundation wisely. It should suit your skin type and skin tone. The type of foundation has high importance in covering dark spots. There are many types of foundations available in the market which have different formulae. Most commonly, foundations come in liquid consistency, but there are other formulae available as well.
Stick foundations are a great choice if you have dark spots, freckles, dark circles, or pigmentation on your skin. Stick foundations have a comparatively thicker consistency than all other foundations, so they tend to stay in place and hide dark spots well. A drawback of stick foundations being thicker is that it might be hard to blend them. You need to apply extra effort while blending stick foundations. Also, the lighting in your room or near the mirror should be bright enough so that you can see the areas on your face correctly where foundations do not reach easily or in one go.
A suitable method of blending stick foundation is by using a beauty blender. Damp the beauty with your favorite makeup setting spray, and then blend the foundation. Gently wipe and then dab the beauty blender on the face to get the foundation blended nicely. Do not wipe the beauty blender to blend the foundation on the areas you have earlier applied a color corrector. To blend the foundation on color corrected areas, dap the beauty blender—the side of the beauty blender over your face will seamlessly melt the foundation into your skin.
If you want a product that feels lightweight on your face, then liquid foundations are another great option to hide dark spots. Many drugstores and high-end cosmetic brands offer liquid foundations that hide dark spots well. Depending on the foundation’s brand and consistency, liquid foundations can give medium to high coverage, perfect for concealing dark spots. If you have only freckles, then you can use a liquid foundation that offers medium coverage. But if you have any stubborn dark spots, visible dark circles, or marks/redness left by acne, you should reach out for a high coverage liquid foundation.
There are techniques to blend liquid foundation as well.
- Take one or two pumps of product on the back of your hand.
- Apply the dots of the foundation using your finger to your face. Make sure to apply multiple dots on dark circles and other dark spots. Do not forget to cover your neck.
- After applying dots of foundation, take a flat petal brush and gently spread the foundation on your face. If you use a round flat top makeup brush for blending foundation, move the brush gently in circular motions on the face. Circular motions will evenly spread the foundation on your face and will let it sit well in its place.
- After you are done applying the first coat of liquid foundation, watch if you have achieved the desired coverage. If you have already completed the desired coverage, then grab a beauty blender, and dab it all over your face. Dabbing will let the foundation look more even and will remove any excess foundation.
- If you feel like you have not achieved the desired coverage, then again apply dots of liquid foundation on your face. This time blend the dots of foundation with a beauty blender. Ensure your foundation reaches every corner of your face and blends nicely near the eyes, around the lips, and nose.
The choice of formulae of the foundation also depends on the event for which you are getting glammed up. If you need to apply foundation daily, it is preferable to use liquid foundations because they are lightweight, give full coverage, and are easy to blend. Liquid foundations also provide a bit dewy coverage, which looks excellent daily. You do not need to wear a highlighter or something in the routine if you use a liquid foundation.
On the other hand, if you are getting dolled up for a night party, wedding, or some other formal event, it is preferred to use a stick foundation because stick foundations do not slip away from your face quickly. Stick foundations give you heavy and matte coverage and stay on your face for a longer time. Perp, prime and moisturize your face well before applying stick foundation because if there will be any dryness on your face, the stick foundation will look patchy on that area.

Step 4: Concealer
After you have applied the foundation and have blended it nicely, the next step is to conceal the areas of pigmentation or darkness. After laying the foundation, hide the dark spots, and use a concealer that is one tone lighter than your skin tone. You can also use a concealer exactly matching your skin tone, but in that case, you must make sure that your concealer does not oxidize after a few hours.
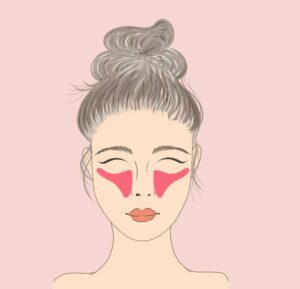
The concealer has a thicker consistency than the foundation, and thus it is an essential step in hiding the dark spots using makeup. It also brightens up your complexion and highlights the dark-toned areas. Even if you use a medium coverage foundation and still see imperfections like dark spots or uneven complexion peeking through your foundation, you should not panic. A concealer is always here for the rescue. Make an upside-down triangular shape by swiping the concealer under your eyes. Blend this concealer using a beauty blender. Just dap the sponge over the concealer to get it blended with your foundation.
You can use a concealer to highlight the brows’ areas, around the lips, middle of the chin, and bridge of your nose. This technique will sculpt your face and enhance the prominent locations.
Step 5: Setting powder or translucent powder
The next step after the application of concealer is to apply a setting powder or a translucent powder. Makeup manufacturing companies and consultants have blessed us with thousands of products that are hard to know what they all do for your skin.
Setting powder and translucent powder may seem like the same product, but they are not! Famous beauty bloggers define setting powders as something that sets the makeup and holds it in place for a longer than usual time. Setting powders prevent makeup from creasing in the folds of your skin. It is also a great choice to give that last touch to hide your dark spots. Your makeup under the eyes and dark spots will stay for a longer time, and thus, you will not get those instant touch-ups after every hour or two.
On the other hand, translucent powders are also known as finishing powders. They are translucent in color and are used to blur pores, soften skin texture, and give an overall glow to the skin.
Translucent powders or finishing powders are for the looks, i.e., if you want to achieve a smooth and bright look, you must use a translucent powder. At the same time, you are setting powders to help you get more hours out of your concealer, foundation, and other face makeup.
Setting powders can be 2in1 compact powders that can be used with either a wet or dry sponge. Such setting powders give good coverage when used in wet form. Other setting powders can be in the form of loose powder. Loose powders are mostly used under the eyes and around the lips to prevent makeup from slipping off.
Translucent powders mostly come in loose powder form and are often used on the whole face and neck to smoothen the makeup look.
You must pick the product using a beauty blender and apply it to the desired areas for applying loose powders. After this, use a kabuki brush to blend the powder evenly. If you do eye makeup after building up the foundation, you should apply the loose powder using a beauty blender first. Do not blend the loose powder until your eye makeup is done. Once you are done with eye makeup, you can blend out the loose powder. This way, any fall out eyeshadow will not ruin your makeup, and you will not have to touch your makeup under the eyes with fingers.
If you use a pressed powder, you can use a sponge to blend it. Pressed powder is again a setting powder and is used to make the makeup stay in place.
Step 6: Makeup Setting Spray
Like most makeup products, using makeup setting spray is up to your personal preference. This step does not hide your dark spots, but it is essential to be hidden for a longer time with makeup if you want your dark spots to be hidden. Makeup setting sprays play a significant role in keeping your makeup in place.
You can skip using a makeup setting spray in winters because you do not sweat a lot, and your skin does not get much oily. You can also forget makeup setting spray if you have worn makeup for a casual event.
On formal occasions, if you need to make your skin look more even and prevent your makeup from creasing in folds of the face, you must use a makeup setting spray.

Lighten Dark Spots Over Time
Using makeup to hide dark spots may be an instant and quick method, but you should look for consistent results. Following a skincare regimen helps with dark spots if you are consistent and follow all the necessary steps regularly. Using the products in the right way is also essential. We recommend not to mix all the products; instead, use one product at a time. Skincare products give results in 2 to 3 months if used regularly. It would help if you looked for products that feature AHA and Vitamin C in their ingredients for hiding dark spots. Both Vitamin C and AHA can help refine the skin’s texture and lighten the blemishes and dark spots.
You must also hydrate your skin and take a sound sleep to prevent dark circles. Use of sunscreen in Sunlight is necessary to prevent skin from pigmentation. Pigmentation also occurs as a result of facial waxing. If you see any signs of pigmentation, you should stop waxing and switch to other hair removal methods.
Conclusion:
Everyone wants to achieve perfect skin, and makeup is a great tool to hide dark spots, dark circles, pigmentation, and other imperfections. Nowadays, the makeup industry manufactures products that can help us achieve spotlessly and even skin with minimum effort. Using the products in the right way is crucial to attaining spotless skin with makeup. Knowledge of makeup products and what product suits your skin is also essential. To hide dark spots, the complexion products like foundation, concealer, and setting powder should match your skin tone or one tone lighter. Neither they shouldn’t be too dark nor too light skin tone.
Besides focusing on quick and easy techniques only, you should also invest in products that give consistent and long-term results.


Iqra
As the head artist of Farishta Beauty I was inspired by many young individuals who were just like me passionate about makeup.
Welcome and thank you for joining us.
